Photoshop Tip: Set Action Keys
I’m always surprised how many designers and art directors still don’t know about setting action keys in Photoshop. If you’re not familiar with Actions in Photoshop, you really need to get on this now. Once you start using them, you’ll appreciate how much time you’ll save yourself on tedious and repetitive steps.
These are some of my Action Keys I have set in Photoshop:
F1 – Delete Layer
F2 – Duplicate Selected Layer
F3 – Flatten Image
F4 – Image Size dialog box (for image resizing)
APPLE+F4 – Canvas Size dialog box
Actions also contain any number of steps within itself. For instance, you could also set an action to lighten an image, rotate it 90 degrees, adjust color balance, Gaussian Blur and save out as a TIFF file – and simply associate all those steps with another action key.
For our example, we’re going to set an action that I use almost every time I open Photoshop – Image Size.
First off, open the image you would like to make changes to.
photo credit: Bryan Larrick
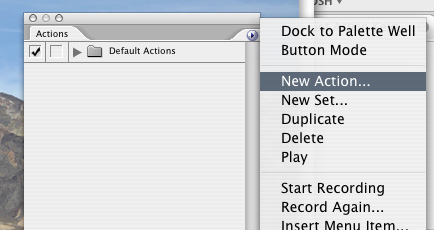
Next, find the Actions window, and select ‘New Action‘
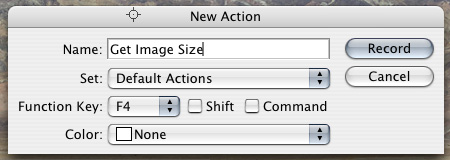
In the New Action dialog box, give the action a name, in this case – “Get Image Size” (or something similar), and then give it a function key, like F4.
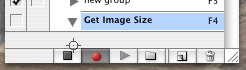
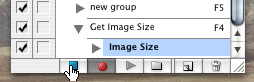
Now, anything we do to affect the image will be recorded in the Actions window for our new “Get Image Size” action, so be careful not to do any extraneous steps, you will know it’s recording by the red circle at the bottom of the Actions window:
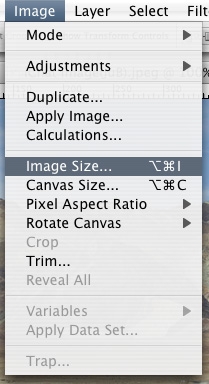
Go to the top menu and select Image>Image Size
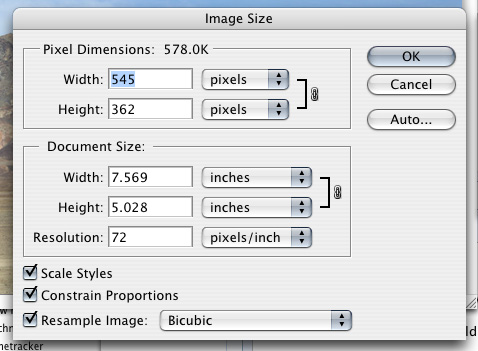
Change the image to a different size (it doesn’t matter what size, because when this action is created, it will automatically bring up this window) and click ‘OK’.
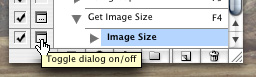
Now go back to the Actions window and at the very bottom of the window, click the button with the square to stop recording our actions.
Some people will note that you can get the Image Size dialog box by hitting Apple+Option+I … but this still takes 2 hands to do… and in my book, that’s still too much work.
The real power in Actions is doing large batches of jobs with them. For instance, if you need to save out an entire directory of JPGs that are optimized for web. All you do is create a Droplet and associate with an Action and just drag all your images on top of the Droplet icon and boom (a la Steve Jobs) … you’re done. But that is a tutorial for another time.